

The popular belief that automating test releases is a luxury reserved for large teams or complex projects is quite misleading.
With Codemagic, app developers in South Africa can automate the most time-consuming app release steps, such as code signing, building and uploading new app versions, and setting changelogs.
And after first-hand experience in how amazing Codemagic is to automate our CI/CD, we couldn’t resist sharing it with the rest of the world!
Here are some quick links and topics I will be discussing in this article:
Some Codemagic advantages for efficient mobile app development
Setting up initial CI/CD Workflows
Add automatic code signing to your workflow
Prepare Flutter dependencies and context
Initiate your first automated build
Some Codemagic advantages for efficient mobile app development
When creating CI/CD pipelines for mobile app development, you don’t want to have to jump through a million hoops to get your app out there. Unfortunately, in the Flutter world, this is quite a mission if you are using the standard command line interface tools for CI/CD.
In this article, we look at how we used Codemagic to magically take care of many of the hoops thus allowing us to only focus on the essentials. We’ll be setting Codemagic up to make Android and iOS Test builds and distribute them to their respective platforms. Running human readable integration tests will be covered in a next part.
When we found Codemagic, we were delighted to see that it hosts quite a lot of advantages, like:
- Great Flutter support
- MacOS-based servers (which are required to build, test, and sign iOS apps)
- A truly amazing free tier that gives you 500 minutes of free running time each month
- Complete coverage of all the features we require (including GitHub webhook support and automated deployments to both AppCenter for Android and TestFlight for iOS!)
- Beautiful and efficient dashboards that help streamline setup and maintenance
- Support for custom scripts throughout the pipeline
- Exporting your pipelines to a YAML-style config file
- Making signing certificate access and management a breeze
Ultimately, using Codemagic speeds up development, supports clean code and improves code quality, speeds up testing, increases reliability, and improves communication.
Setting up Codemagic
Our basic pipeline (called a “workflow” in Codemagic) will flow as follows:
- We commit and push the code to GitHub
- GitHub webhook initiates the workflow as soon as a commit is made. Codemagic pulls the latest code from the repo.
- Flutter dependencies and context are prepared
- Key Dependencies are prepared
- Application bundles are built and signed
- We release the test builds
- Android: To App Center
- iOS: To FlightCenter
Setting up initial CI/CD Workflows
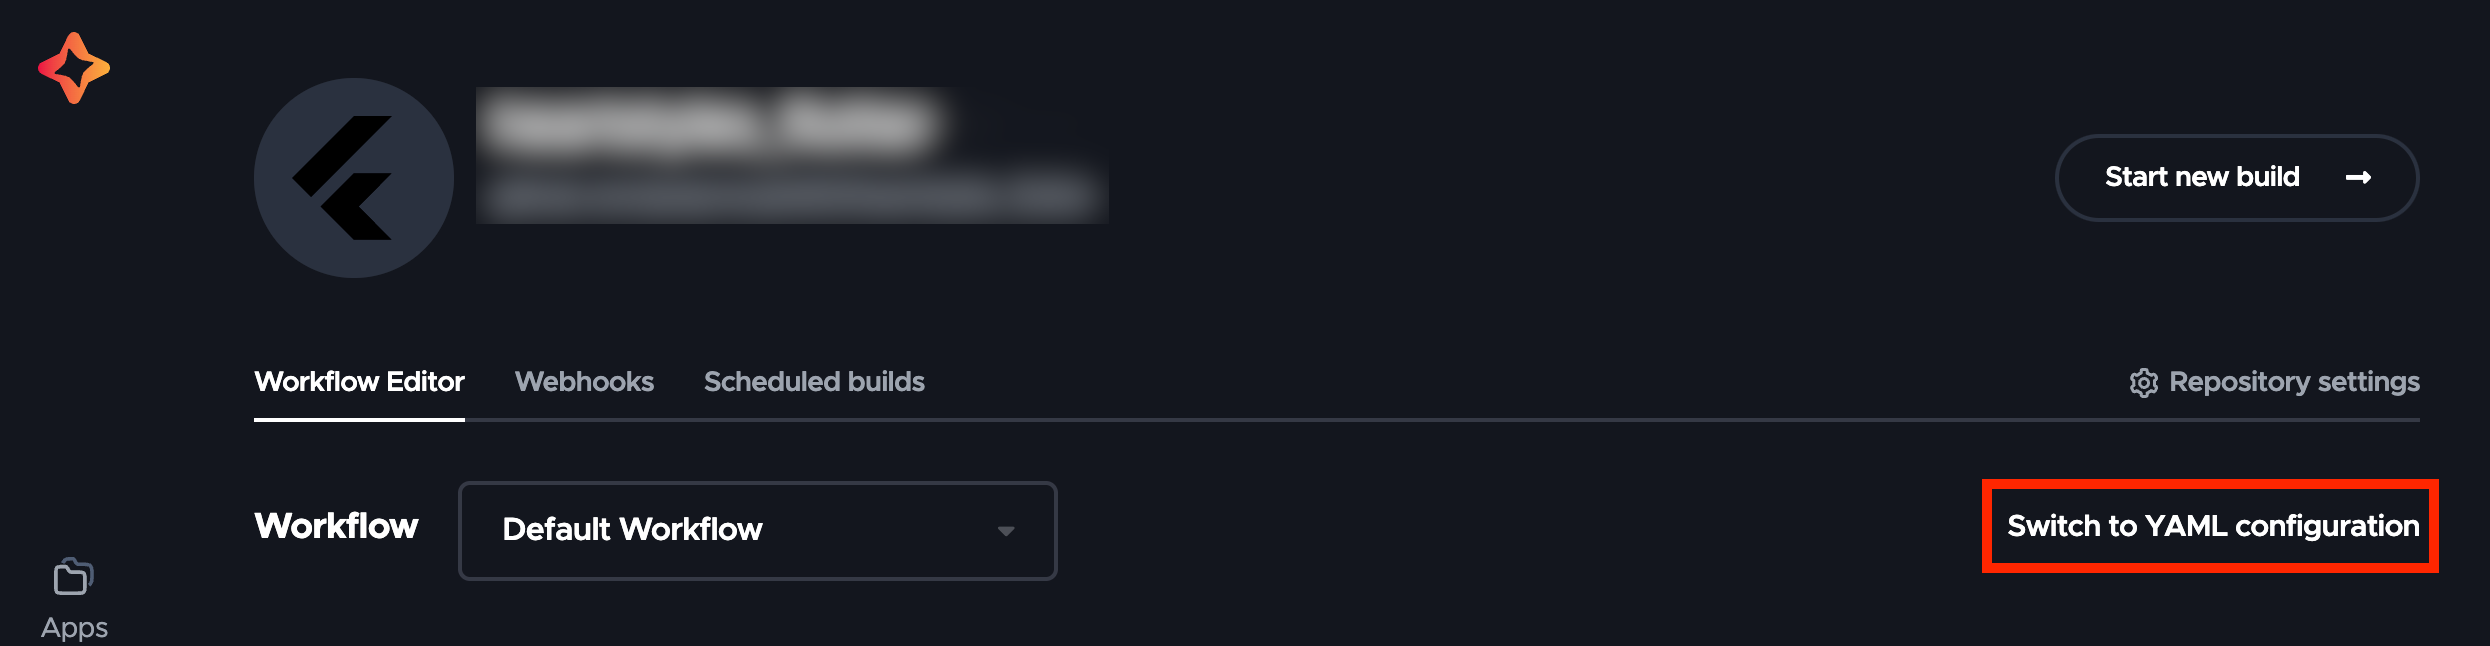
The first step is to determine how our workflows will work. Since we want to publish to both iOS and Android, ideally simultaneously, we suggest creating one workflow for each. This is how:- Go to your project settings in Codemagic and make sure you are on the Workflow Editor tab
- Select the Switch to YAML configuration to convert the default settings to a codemagic.yaml file.
- You will then see the Update settings popup, which allows you to switch between the Workflow Editor or YAML config. Check the Export current configuration as codemagic.yaml option to download the YAML config file after it has been converted.
- Download the yaml file and place it in the root file of your application on your local machine.
- Back in the browser, click on Enter builder mode
- Look under the workflows section
- Duplicate the default workflow, rename the default workflow to iOS Workflow and the duplicated one to Android Workflow.
Add automatic code signing to your workflow
The most important step when it comes to publishing your mobile app, even just for testing purposes, is to set up the code signing process; otherwise, no distribution service will accept it. There is a slightly different process for signing android and iOS apps via Codemagic, but luckily for us, both are quite simple!iOS Workflow
-
- Generating an App Store API key for your mobile app:
Please note that only App Store Connect administrators have the capability to create an API key. It is recommended to create a dedicated App Store Connect API key specifically for Codemagic within App Store Connect. In order to do so, the following steps should be followed:
- Log in to App Store Connect and navigate to the “Users and Access” section, then select “Keys.”
- Click on the + sign to generate a new API key.
- Enter a suitable name for the key and select an appropriate access level. Choose the “App Manager” role since it has the necessary permissions to upload to the store.
- Click on the “Generate” button.
- Once the key has been generated, it will be added to the list of active keys. Click Download API Key to save the private key for later use. Please note that the key can only be downloaded once.
- Generating an App Store API key for your mobile app:
Please note that only App Store Connect administrators have the capability to create an API key. It is recommended to create a dedicated App Store Connect API key specifically for Codemagic within App Store Connect. In order to do so, the following steps should be followed:
-
- Integrating the Apple Developer Portal with your account:
The integration of the Apple Developer Portal can be activated in the Teams section under Personal Account for solo projects. This allows for the seamless use of the same access credentials for automatic code signing and publishing across various applications and workflows.
- Expand the Integrations list. This will display all available integrations Codemagic offers.
- Find the Developer Portal option and press the Connect button..
- Supply a name for the key that will be set up for the integration in the App Store Connect API key name field. This is used for identifying the key within Codemagic and will be referenced in the yaml file later.
- Locate the Issuer ID above the table of active keys on the User and Access page in App Store Connect. Enter said ID into the Issuer ID field in Codemagic.
- Input the Key ID of the key that will be utilised for code signing.
- Upload the private API key, which was downloaded from App Store Connect, in the API key field.
- Click Save to complete the setup.
- Integrating the Apple Developer Portal with your account:
The integration of the Apple Developer Portal can be activated in the Teams section under Personal Account for solo projects. This allows for the seamless use of the same access credentials for automatic code signing and publishing across various applications and workflows.
-
- Uploading/Generate a certificate within CodeMagic:
- Go to Personal Account under Teams
- Under codemagic.yaml settings, expand Code signing identities and select the iOS certificates tab
- If you have a p12 certificate available you can upload it here
- Insert the Certificate password
- Insert a unique reference name that will b used in the yaml configuration
- Click on Add certificate
- If you don’t have a p12 certificate available, you can generate one
- Provide certificate type, ie Apple Development
- Insert a reference name
- Select API key from step 2
- Click on Create certificate
- You will then be given the password and the opportunity to download the certificate (can only be downloaded once.
- If you have a certificate but don’t have the p12 file, you can fetch any certificate by clicking on the Fetch certificate button. This will give you a list of available certificates and you simply have to select the correct one.
- Provision profiles:
- Go to Personal Account under Teams
- Under codemagic.yaml settings expand Code signing identities and select the iOS provisioning profiles tab
- If you have a provisioning profile, you can simply upload it from your device or automatically fetch it via the Fetch profiles button.
- It is advised to provide a unique reference name for your profile.
- We need to let Codemagic know where to find our app on App Store Connect. In the yaml file under the iOS workflow, add the following right under the environment section:
- Uploading/Generate a certificate within CodeMagic:
-
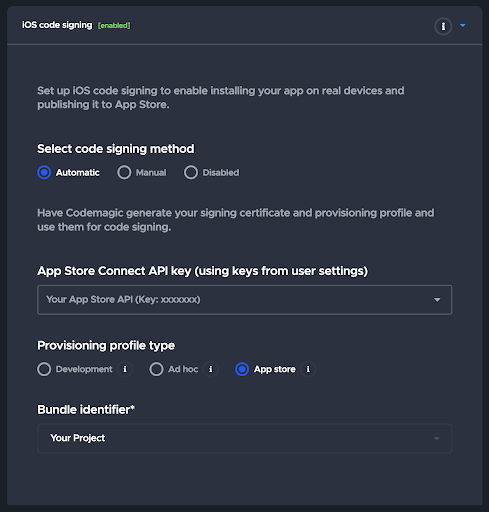
- Enabling automatic code signing:
To enable automatic code signing per workflow, you can;
- Switch to Workflow Editor in your project settings in Codemagic
- Scroll down to App settings > Distribution > iOS code signing.
- Select Automatic (if you haven’t completed step 2 above yet, you will be asked to do so here).
- Select the right key in the App Store Connect API key field.
- Select the provisioning profile type used for provisioning the build.
- Select your app’s bundle identifier. If you can’t see your app’s bundle identifier listed, create one in Apple Developer Portal.
- Switch back to YAML configuration
- Enabling automatic code signing:
To enable automatic code signing per workflow, you can;
Android Workflow
First you will have to follow the instructions in Codemagic’s documentation to generate a new keystore. Then, you can set up Android code signing in Codemagic;
- Go to Personal Account under Teams
- Under codemagic.yaml settings, expand Code signing identities and select the Android keystore tab
- Upload your generated keystore file
- Insert the Keystore password, Key alias, and Key password you provided during the keystore generation
- Insert a unique Reference name that will be used in the yaml configuration
- Click on add keystore
Next, we need to export the credentials of the keystore as environment values. In your yaml file under the environment section, add the following:
Unique reference name is the name you used while uploading your Android Keystore.
All done!
Prepare Flutter dependencies and context
When we initiate a workflow, we would like to run a few scripts to prepare a few dependencies first. This includes generating the pubspec.yaml file for the build as well as setting the correct environment. At the top of the codemagic.yaml file simply add a scripts section if there isn’t one already and add the script for preparing Flutter dependencies as follows:iOS has the addition of Pod files that need to be prepared. Similarly to the above, we simply run a script to find the Podfile and run pod install in the ‘directory’ directory.
Following this, we can add a script to assign the environment. This is optional as it depends on how your environments are set up. In our case, we have a script to load all the environment settings from a json file. We then use different branches for different environments, such as QA doubling as version control.
Now we need to make sure these scripts are executed in the workflows.
iOS Workflow
Within the iOS Workflow, go down to scripts and add the following scripts:This will execute all the dependency scripts required for an iOS build.
Android Workflow
Within the Android Workflow, go down to scripts and add the following scripts:This will execute all the dependency scripts required for an Android build. All project dependencies should now be set, and the correct environment will be assigned once a build is initiated.
Prepare key dependencies
Next, we need to prepare the key dependencies. This will be done in the codemagic.yaml file and needs to be done so that Codemagic knows which signing configuration to use for this specific app.iOS Workflow
First we need to run a few scripts: In your codemagic.yaml file under the scripts section as before add the following scripts:These will initialise the keychain, add the keychains certificates as well as passwords. Next, we need to run these scripts when the iOS Workflow is executed. As before, add the following below the previous scripts:
Android Workflow
First we need to run a few scripts: In your codemagic.yaml file under the scripts section as before add the following scripts:These will prepare the Android key properties for the build by loading them from Codemagic variables into the key.properties file as well as indicating where the Flutter SDK is. Next, we need to run these scripts when the Android Workflow is executed. As before, add the following below the previous scripts:
Building the binaries
Now we need to add the scripts that will actually build and sign the apps for us. Add the following to your yaml file: iOS Workflow First we need to add the script under the top level scripts section:Then we can add the execution of the script under the scripts section within the iOS Workflow:
This will build the ipa file using the given dependencies and properties for us. Android Workflow First, we need to add the script under the top-level scripts section:
Next we add the script under the scripts section of the Android Workflow:
This will make a signed abb file ready to be published. Since we would like to publish to AppCenter for testing purposes, some more configuration is required.
Automated app publishing
Now for publishing the apps to their respective platforms. As these will only be Test builds, we want to publish the iOS build to Testflight and the Android build to App Center.iOS Workflow
The iOS flow is quite straightforward. Simply add the following to the iOS Workflow:This simply tells Codemagic which App on Testflight to use when publishing the app. From there, we just need to wait until the Testflight is finished processing the build, manage some encryption configs and then select whichever testing groups we would like to test on. Note any external testing groups might initiate a review that might take a day or two to complete.
Android Workflow
First, we need to add the script under the top-level scripts section:Next we add the script under the scripts section of the Android Workflow ensuring that it is executed:
This will install all dependencies for App Center and then publish the abb file to our project settings within App Center using the provided properties.
Initiate your first automated build
The Codemagic UI allows you to manually trigger a build via the workflow editor, but since we’re all about automating as much as possible, we’ll commit a file to the linked Github repository and let Codemagic do its thing! Firstly, tell Codemagic to listen to your repo for any commits and initiate a build if all criteria are met.- Back in Codemagic, go to your App settings
- Open your repository settings
- Paste your repo url under the repository URL, e.g. https://github.com/[project name]
Back in the App settings, switch to the Workflow Editor and do the following:
- Under Build triggers, ensure that trigger on push is enabled and the other three are disabled.
- Under Watched branch patterns, add the branch you will be using for your testing environment, i.e. staging
- Make sure Include and source are selected for the drop downs
Next, we need to make sure that the yaml file in your code base is the same as on Codemagic.
- Switch to yaml configuration in Codemagic.
- Paste the contents in the codemagic.yaml file you’ve copied into your root file of your code base before, making sure you replace everything that was previously there.
The project is now ready to be committed to Github, which should initiate a build using the branch name as an indicator of which environment to use. Stage, commit and push your local changes to the branch you indicated above and watch the magic happen. You can have a look at all running builds via https://codemagic.io/builds.
Workflow notifications
Setting up email and Slack notifications for your workflow is pretty simple!- Email: In the workflow editor, go to Notifications > Email and follow the prompts!
- Slack: You will first need to connect the Slack workspace in Teams > Personal Account > Integrations > Slack. You can then enable Slack publishing and select a channel for publishing by going back to your workspace’s editor, Notifications > Slack.
One config to rule them all
After all these steps are done, it’s a good idea to save your workflow config once again as YAML, update your repo with this file, and once again commit and push this to Github to make sure your setup persists.All done!
You now have an automated CI/CD setup for your Flutter project! This was Part 1, where we only handled the building and distribution for our testing environments. Next, we’ll dive into Part 2 where we will distribute our Production builds. Link coming soon - bookmark this as part of your app development best practices.Extra resources
Codemagic hosts great documentation and tutorials on everything you might need to know about how to set up automated CI/CD using their web app. Some that might help you include:- Initial setup and integrating with AWS S3 for build file backup: https://blog.codemagic.io/cicd-with-flutter-and-aws/
- Code signing: https://docs.codemagic.io/flutter-code-signing/ios-code-signing/
- Publishing: https://docs.codemagic.io/flutter-publishing/publishing-to-app-store/
- Notifications: https://docs.codemagic.io/flutter-notification/email-and-slack-notifications/
- Automated testing: https://docs.codemagic.io/flutter-testing/running-automated-tests/
- Youtube tutorials: https://www.youtube.com/@codemagic212
Prepare Flutter dependencies and context
When we initiate a workflow, we would like to run a few scripts to prepare a few dependencies first. This includes generating the pubspec.yaml file for the build as well as setting the correct environment.
At the top of the codemagic.yaml file simply add a scripts section if there isn’t one already and add the script for preparing Flutter dependencies as follows:
<script src=”https://gist.github.com/scfourie47/fa049537b01ad6a4c195f26c179cf8f5.js“>
</script>
iOS has the addition of Pod files that need to be prepared. Similarly to the above, we simply run a script to find the Podfile and run pod install in the ‘directory’ directory.
<script src=”https://gist.github.com/scfourie47/a818444ae02e04aa11686f75d016609b.js“>
</script>
Following this, we can add a script to assign the environment. This is optional as it depends on how your environments are set up. In our case, we have a script to load all the environment settings from a json file. We then use different branches for different environments, such as QA doubling as version control.
<script src=”https://gist.github.com/scfourie47/4bbc347ac47c53ab97280f0cf9cdbd6d.js“>
</script>
Now we need to make sure these scripts are executed in the workflows.
iOS Workflow
Within the iOS Workflow, go down to scripts and add the following scripts:
<script src=”https://gist.github.com/scfourie47/e084a3b93d6c91da6795de7fe583466c.js“>
</script>
This will execute all the dependency scripts required for an iOS build.
Android Workflow
Within the Android Workflow, go down to scripts and add the following scripts:
<script src=”https://gist.github.com/scfourie47/71b631acab8ab4fb8e68aa24c1176075.js“>
</script>
This will execute all the dependency scripts required for an Android build.
All project dependencies should now be set, and the correct environment will be assigned once a build is initiated.
Prepare key dependencies
Next, we need to prepare the key dependencies. This will be done in the codemagic.yaml file and needs to be done so that Codemagic knows which signing configuration to use for this specific app.
iOS Workflow
First we need to run a few scripts:
In your codemagic.yaml file under the scripts section as before add the following scripts:
<script src=”https://gist.github.com/scfourie47/c441d8bdc67a06c3b36e937069a033a5.js“>
</script>
These will initialise the keychain, add the keychains certificates as well as passwords.
Next, we need to run these scripts when the iOS Workflow is executed. As before, add the following below the previous scripts:
<script src=”https://gist.github.com/scfourie47/17ba9eea2807e8e2ff2ca92b37a603d3.js“>
</script>
Android Workflow
First we need to run a few scripts:
In your codemagic.yaml file under the scripts section as before add the following scripts:
<script src=”https://gist.github.com/scfourie47/d108ff94ed5f72d471a8806b130d58d5.js“>
</script>
These will prepare the Android key properties for the build by loading them from Codemagic variables into the key.properties file as well as indicating where the Flutter SDK is.
Next, we need to run these scripts when the Android Workflow is executed. As before, add the following below the previous scripts:
<script src=”https://gist.github.com/scfourie47/bf06f7fe7e02cb6d852266d394847108.js“>
</script>
Building the binaries
Now we need to add the scripts that will actually build and sign the apps for us. Add the following to your yaml file:
iOS Workflow
First we need to add the script under the top level scripts section:
<script src=”https://gist.github.com/scfourie47/b1f9db6709d06712478ff379d69e6947.js“>
</script>
Then we can add the execution of the script under the scripts section within the iOS Workflow:
<script src=”https://gist.github.com/scfourie47/ab1e09ef4a8d83a91a51f59dcce3dfbf.js“>
</script>
This will build the ipa file using the given dependencies and properties for us.
Android Workflow
First, we need to add the script under the top-level scripts section:
<script src=”https://gist.github.com/scfourie47/a9fb7d5e87ea7a696996342f86c94ba9.js“>
</script>
Next we add the script under the scripts section of the Android Workflow:
<script src=”https://gist.github.com/scfourie47/7f07fc06d8fdb75926dd35c4c01443e8.js“>
</script>
This will make a signed abb file ready to be published. Since we would like to publish to AppCenter for testing purposes, some more configuration is required.
Automated app publishing
Now for publishing the apps to their respective platforms. As these will only be Test builds, we want to publish the iOS build to Testflight and the Android build to App Center.
iOS Workflow
The iOS flow is quite straightforward. Simply add the following to the iOS Workflow:
<script src=”https://gist.github.com/scfourie47/09725ccf41a8fc26a9acdf9e1e31d9a8.js“>
</script>
This simply tells Codemagic which App on Testflight to use when publishing the app. From there, we just need to wait until the Testflight is finished processing the build, manage some encryption configs and then select whichever testing groups we would like to test on. Note any external testing groups might initiate a review that might take a day or two to complete.
Android Workflow
First, we need to add the script under the top-level scripts section:
<script src=”https://gist.github.com/scfourie47/b0286693c484a066187d3aa2ec291882.js“>
</script>
Next we add the script under the scripts section of the Android Workflow ensuring that it is executed:
<script src=”https://gist.github.com/scfourie47/a2d1dbf475ab94b49ae8b94fa8386189.js“>
</script>
This will install all dependencies for App Center and then publish the abb file to our project settings within App Center using the provided properties.
Initiate your first automated build
The Codemagic UI allows you to manually trigger a build via the workflow editor, but since we’re all about automating as much as possible, we’ll commit a file to the linked Github repository and let Codemagic do its thing!
Firstly, tell Codemagic to listen to your repo for any commits and initiate a build if all criteria are met.
- Back in Codemagic, go to your App settings
- Open your repository settings
- Paste your repo url under the repository URL, e.g. https://github.com/[project name]
Back in the App settings, switch to the Workflow Editor and do the following:
- Under Build triggers, ensure that trigger on push is enabled and the other three are disabled.
- Under Watched branch patterns, add the branch you will be using for your testing environment, i.e. staging
- Make sure Include and source are selected for the drop downs
Next, we need to make sure that the yaml file in your code base is the same as on Codemagic.
- Switch to yaml configuration in Codemagic.
- Paste the contents in the codemagic.yaml file you’ve copied into your root file of your code base before, making sure you replace everything that was previously there.
The project is now ready to be committed to Github, which should initiate a build using the branch name as an indicator of which environment to use.
Stage, commit and push your local changes to the branch you indicated above and watch the magic happen. You can have a look at all running builds via https://codemagic.io/builds.
Workflow notifications
Setting up email and Slack notifications for your workflow is pretty simple!
- Email: In the workflow editor, go to Notifications > Email and follow the prompts!
- Slack: You will first need to connect the Slack workspace in Teams > Personal Account > Integrations > Slack. You can then enable Slack publishing and select a channel for publishing by going back to your workspace’s editor, Notifications > Slack.
One config to rule them all
After all these steps are done, it’s a good idea to save your workflow config once again as YAML, update your repo with this file, and once again commit and push this to Github to make sure your setup persists.
<script src=”https://gist.github.com/scfourie47/53339b12391cf19f7cf7a38a2c5a8583.js“>
</script>
All done!
You now have an automated CI/CD setup for your Flutter project! This was Part 1, where we only handled the building and distribution for our testing environments. Next, we’ll dive into Part 2 where we will distribute our Production builds. Link coming soon – bookmark this as part of your app development best practices.
Extra resources
Codemagic hosts great documentation and tutorials on everything you might need to know about how to set up automated CI/CD using their web app. Some that might help you include:
- Initial setup and integrating with AWS S3 for build file backup:
https://blog.codemagic.io/cicd-with-flutter-and-aws/ - Code signing:
https://docs.codemagic.io/flutter-code-signing/ios-code-signing/ - Publishing:
https://docs.codemagic.io/flutter-publishing/publishing-to-app-store/ - Notifications:
https://docs.codemagic.io/flutter-notification/email-and-slack-notifications/ - Automated testing:
https://docs.codemagic.io/flutter-testing/running-automated-tests/ - Youtube tutorials:
https://www.youtube.com/@codemagic212