Background
End-to-end (e2e) testing is a method of software development testing that validates user flows and behaviour. With this testing methodology, we can simulate and automate a suite of tests that perform actions as our users would.
When dealing with large production systems, you will quickly see that exclusively performing manual exploratory testing results in a bottleneck. As your team and their velocity grows, you would need to drastically grow your manual testing to limit regression of existing features.
Manual QA’s have to spend way too much time doing exploratory testing, and trying to replicate out-of-date test cases for older features. This leads to poorly tested features and additional risk of regression.
For the purposes of the demonstration, the application we’re building has a React frontend. In the Javascript ecosystem, there are two technologies that can help us greatly in automating the testing process of core functionality; Cypress and Cucumber.
Cypress
Cypress is a frontend web testing tool built for the modern web that can test anything that runs in a browser. It has a couple of features that make it the perfect tool for testing a web application:
- It has a great API to target and interact with the DOM (it uses jQuery’s selector engine, so it’s familiar to developers)
- Robust retry-and-timeout logic to make the developer experience easier (instead of having to write custom timeouts and retries, Cypress automatically retries searching for the element instead of throwing an error)
- Assertions for the state of various DOM elements
- It takes screenshots & videos while your tests are running
- Cross-browser testing; run tests within Firefox and Chrome-family browsers optimally.
- Tests can be run through the Cypress browser, a very handy test execution tool at the time of writing tests. It captures and displays the state of the website between each interaction, making backtracking very easy.
Cucumber
Cucumber is a behaviour-driven development (BDD) tool. It allows us to write our tests in plain text, and validates that the software does what these specifications say and reports back if it doesn’t.
Cucumber uses a basic syntax called Gherkin to understand these plain text blocks. Gherkin has a set of keywords that are used to structure your BDD tests in a meaningful, executable fashion. Gherkin also supports over 70 spoken languages, but for now we’ll stick to English.
Each Gherkin step is linked to a code block called a step definition. Step definitions are small pieces of dynamic code that describe what the test runner needs to do when it sees this sentence. When Cucumber executes a Gherkin step, it looks for a matching step definition to execute.
Each feature is described using a feature file; a standardised format describing the feature under test, its scenario, the actions that are taken by the user, and our expected outcomes.
Gherkin’s plain text format allows non-coder team members to document test cases without having to understand code at all, but with the added benefit of automation and version control.
Putting it all together
Cypress and Cucumber play very nicely with each other through the cypress-cucumber-preprocessor. This allows us to specify our Step Definitions in Cypress’ API and utilise its test runner to record test runs.
In this section, we’ll go through some basic implementation and I’ll show you how we have configured Cypress & Cucumber for our code base.
Folder Structure
As mentioned previously, we have a React frontend. We have structured our code base in the following manner:
» tree
├── node_modules/
├── build/
├── cypress/
│ ├── fixtures
│ ├── integration
│ ├── plugins
│ ├── screenshots
│ ├── support
│ ├── utils
│ └── videos
├── cypress.json
├── package.json
└── src/
I have omitted some directories irrelevant to this article. The general structure is that we have a cypress directory in the root of our project to contain all of our tests, and a src directory to contain our React code.
Example Component
Suppose our application had a Login page.

How would we go about testing this feature? Well, let’s look at our code and inspect all of the paths that our users could traverse on this page.
Here is our component:
					import React, { useState } from "react";

function Login() {
  const [email, setEmail] = useState("");
  const [password, setPassword] = useState("");
  const [loggedIn, setLoggedIn] = useState(false);

  const handleSubmit = async (e) => {
    e.preventDefault();

    try {
      // call some login function

      setLoggedIn(true);
    } catch (e) {
      setLoggedIn(false);
    }
    setEmail("");
    setPassword("");
  };

  return (
    <form onSubmit={handleSubmit}>
      {loggedIn ? <h1>Logged In!</h1> : <h1>Log In</h1>}
      <div>
        <label htmlFor="email">Email</label>
        <br />
        <input
          id="email"
          value={email}
          onChange={(e) => setEmail(e.target.value)}
          type="text"
        />
      </div>
      <div>
        <label htmlFor="password">Password</label>
        <br />
        <input
          id="password"
          value={password}
          onChange={(e) => setPassword(e.target.value)}
          type="password"
        />
      </div>
      <button type="submit">Submit</button>
    </form>
  );
}

export default Login;
We have a basic login form with an email and password field. When the user logs in with a valid username and password, we change the banner from “Log In” to “Logged In!”.
Suppose we wanted to test this user journey to ensure that our login behaves as expected. This is a fairly simple test, but I’d recommend using this example as your first test on every application.
How would we test this feature?
First, let’s look at what’s happening in this component.
- When the user lands on the page, we initialise our “email” and “password” fields to be empty.
- When the user lands on the page, we are not logged in.
- When the user types a value into the “email” or “password” fields, their states get updated and the new values display in the inputs.
- When the user clicks on the Submit button (or presses the Enter key when the form is focussed), the form submits.
- When the form submits, we call our login service method.
- If the user authenticates successfully with our backend, we set our loggedIn state to true
- If the user does not authenticate successfully with our backend, we set our loggedIn state to false.
- When our loggedIn state changes, we update our banner accordingly.
We notice that there are 6 different steps that need to execute correctly in order for a user to log in. We can ignore our state management for now; this is a simple enough example that we do not need to test React’s core state management functionality. What’s left after that, is for us to validate the business logic that happens when the user types in correct or incorrect credentials.
Feature Files
When doing behaviour-driven software development with Cucumber, we specify concrete examples to specify what we want the software to do. In Cucumber, these examples are called Scenarios and they are specified in .feature files. Let’s create our first feature file:
					Feature: Login page

Scenario: Successful login
  Given I am on the '/' page
  When I type 'test@user.co' into the 'email' field
  And I type 'P@ssW0rD!' into the 'password' field
  And I click the 'Submit' button
  Then I see the 'Logged In!' banner
Here we specify the feature under test (our Login page), and give a concrete scenario of how we want the software to behave. In our scenario, we give the steps that the test runner needs to perform to execute a successful login. Given, When, and Then are some of the keywords recognised by Cucumber to semantically indicate background context, user actions, and expected results/outcomes. After each of these keywords, we see a human-readable sentence that will map to our step definitions.
Step Definitions
After writing this feature file, we’ll notice that the test fails. We need to define what needs to happen when each of these steps are recognised. If Cucumber sees “When I type ‘test@user.co’ into the ‘email’ field”, what does it need to do in the background to execute this behaviour? This is what is called a Step Definition. A Step Definition (or StepDef) is a set of instructions that is executed when a specific command is recognised.
In our example, we see four distinct steps:
- I am on the “/” page
- I type “x” into the “y” field
- I click the “x” button
- I see the “x” banner
We need to tell Cucumber how to execute each of these steps. Using Cypress’ API, we can easily target the browser DOM to interact with our form components.
Let’s use step number two as an example:neer positions below.
					/* eslint-disable no-undef */
import { Given, When, Then } from "cypress-cucumber-preprocessor/steps";

Given(`I am on the {string} page`, (url) => {
  cy.visit(url);
});

When(`I type {string} into the {string} field`, (value, id) => {
  cy.get(`#${id}`).type(value);
});

When(`I click the {string} button`, (id) => {
  cy.contains(`${id}`).click();
});

Then(`I see the {string} banner`, (value) => {
  cy.contains(value);
});
We tell Cucumber (using the cypress-cucumber-preprocessor) to identify this step, and take in two generic string arguments. First, the value the user wants to type in, and second the element that needs to be targeted. Then, we select the element by its ID by calling cy::get, and once that field is detected, we can call .type(value) to simulate a user typing.
Here is the full list of our step definitions:
Generic Step Definitions
You’ll notice that I haven’t hard-coded the element ID or the text to be input. This is the power of Cucumber; initially, it’ll take some time to build up a library of reusable step definitions. However, once you’ve written the StepDef for one text input, this definition can be reused across your entire application.
A useful method of generifying step definitions is to target elements on the screen that your users can clearly see. We can set up our Cypress Step Definitions to target labels instead of CSS class names or IDs. That way, our QA Analysts can easily identify form fields without having to inspect the source code; they simply target elements by their labels.
					/* eslint-disable no-undef */
import { Given, When, Then } from "cypress-cucumber-preprocessor/steps";

Given(`I am on the {string} page`, (url) => {
  cy.visit(url);
});

When(`I type {string} into the {string} field`, (value, id) => {
  cy.get(`#${id}`).type(value);
});

When(`I click the {string} button`, (id) => {
  cy.contains(`${id}`).click();
});

Then(`I see the {string} banner`, (value) => {
  cy.contains(value);
});
Running the tests
We can run our tests using the cypress runner, or using their headless runner. During debugging, it’s useful to see the test execution process, but in our CI pipelines we want to run a headless browser.
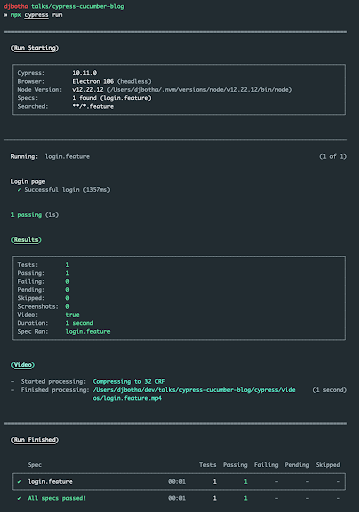
Cypress generates a video of the test execution, and can also take screenshots on error. This will allow us to run our tests in a headless environment, and we can inspect the videos to determine why a test might have failed.
Conclusion
In this article, we have successfully set up the environment required to start writing your end-to-end tests using Cypress and Cucumber. In future articles we will dive deeper into the software development lifecycle, and how the team can work together to accurately and efficiently test our product.
Do you have a strong passion to develop software that adds value to clients and creates engaging experiences for users?
Do you enjoy working with highly skilled and agile teams of software engineers, product managers, UX designers and researchers, software architects, software developers and QA analysts and engineers?
If you’ve answered yes to any of these questions, have a look at our open software engineer positions below.